AI PEOPLE REMOVER
Remove person from photo free with AI.
Remove person from photo directly on this page by brushing over the complete figure and any connected shadow. The AI people remover rebuilds a plausible path, wall, water, or texture while keeping the rest of your image visible for review.
STEP 1
Upload your photo
Or try a sample
Loads into the editor. You choose whether to generate an edit.Tested on 4 October 2026
Remove people from a photo while preserving the surrounding pixels
Paint over the whole unwanted person, including their shadow where needed, and describe the removal. The returned edit is composited inside your selection at the original image dimensions. Unselected pixels are copied from the source rather than regenerated.
In this real 275 × 401 NASA group photo, we selected the person on the far left. The result retained four people at 275 × 401; comparing decoded RGBA pixels against the source found 0 changed pixels outside the saved selection mask.
Pixel preservation outside a selection does not guarantee perfect reconstruction inside it. Cover the full person and inspect the background for seams. AI editing requires an account and credits; provider outages can interrupt a request. Generated background is plausible content, not a record of what was behind the person.
Open the test measurementsSource photo: NASA. This edit is a demonstration, without NASA endorsement.
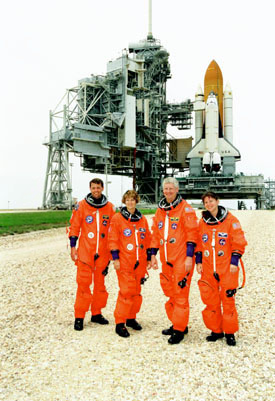
BEFORE / AFTER
Remove person from photo: before and after
Switch views or drag to inspect the edited area. Recorded results and illustrations are clearly labeled.

The person is removed, but a thin remnant remains by the wall. Zoom in before accepting a result.
Fictional sample images processed in a recorded product test. Compare the original, selected area and actual output. Your result will depend on the image and selection.
Open original imageRemove People
Switch views or drag to inspect the edited area. Recorded results and illustrations are clearly labeled.
Remove a person from photoHOW IT WORKS
How to remove a person from a photo in three steps
Upload the original
Start with the highest-resolution file available so the editor has useful texture around the person.
Cover the complete person
Brush over clothing, hair, bags, shoes, and any contact shadow that would look unnatural if left behind.
Generate and compare
Review the rebuilt area at normal size and zoom in on straight edges, repeated texture, and light before downloading.
DETAILED GUIDE
How the AI people remover rebuilds the background
When you remove a person from a photo, the covered area does not contain a hidden copy of the original background. InpaintingAI studies visible context around the selection and generates a plausible continuation. A beach may continue with sand and water, a city scene may continue with pavement or a wall, and a landscape may continue with foliage. The result is a reconstruction, so the best quality comes from a clear selection surrounded by useful visual evidence.
A tight mask is usually more reliable than painting across a wide part of the image. Include hair, clothing, shoes, bags, and the small contact shadow under the person, but preserve nearby faces, railings, signs, and architectural lines. If a tourist overlaps an important subject, remove the exposed parts in smaller passes and compare each result. This gives the AI people remover a more focused problem and makes unwanted changes easier to spot.
After the edit, use the single-image comparison slider instead of judging two separate thumbnails. Move the divider across the removed figure and examine texture, perspective, lighting, and repeated patterns. Zoom in on the boundary where generated pixels meet the original photo. If you see a halo, duplicated object, broken line, or smeared surface, return to the original and make a more precise selection before generating again.
People you can remove from photos you own
Tourists in travel photos
Remove tourists from a photo when they distract from a landmark, beach, viewpoint, or street scene, while keeping the main subject and composition intact.
A background photobomber
Remove a photobomber from a photo by selecting the whole background figure, including visible limbs and any shadow that would otherwise remain.
Passersby in property photos
Clear an incidental passerby from a real-estate or hospitality image when you own the photo and need a calmer presentation of the space.
One person at the edge
Crop only when it improves the framing. When cropping would cut off the main scene, the AI people remover can rebuild the small edge area instead.
When to use a remove person from photo tool
Remove Person from Photo is the focused workflow for clearing one tourist, passerby, photobomber, or background figure without cropping the whole composition. Use the remove person from photo editor when the person is the only distraction and the surrounding path, wall, sky, water, or foliage gives the model enough context to rebuild the selected area.
For a group, use the AI people remover in separate passes instead of masking every figure at once. This makes it easier to remove people from photos while protecting the main subject, facial details, architecture, and lighting. It also lets you compare each person-removal result before continuing with the next selection.
PRACTICAL CHECKS
Remove person from photo FAQ
- Keep the mask just outside the silhouette.
- Preserve important faces and straight architectural edges.
- Retry from the original if a first result changes too much.
FAQ
Can AI reveal what was behind a person?
No. It generates a plausible continuation from visible context; it cannot recover pixels the camera never captured.
Should I remove several people at once?
For the most controllable result, work one person at a time and review each generated edit before the next pass.
Do I need to mark a shadow?
Include a connected contact shadow when leaving it would make the scene look wrong. Long or complex shadows are often better as a separate pass.
RELATED IMAGE TOOLS